 I'm a tech professional (ex-Amazon) with experience including software engineering, and management. Currently living in NYC.
 Deploy to S3 using SiteLeaf: A Step by Step Guide
I recently started using SiteLeaf as a CMS for this blog. Though I have been using Jekyll for a while, SiteLeaf is my first online CMS for this website. In an effort to improve documentation around the topic of publishing a SiteLeaf website to S3, I present this step-by-step guide.
Assumption: This guide assumes you are already hosting a static website using S3, and will not cover actually setting up static website hosting using S3. If you’d like a guide for S3 static website hosting, start with AWS’s official user guide.
How to host a SiteLeaf website on S3
Table of contents
1. Create a bucket access policy
Policies define who has access to AWS resources and actions. In our case the resource in question is our website’s S3 bucket, and the actions are adding/deleting/updates files inside those buckets.
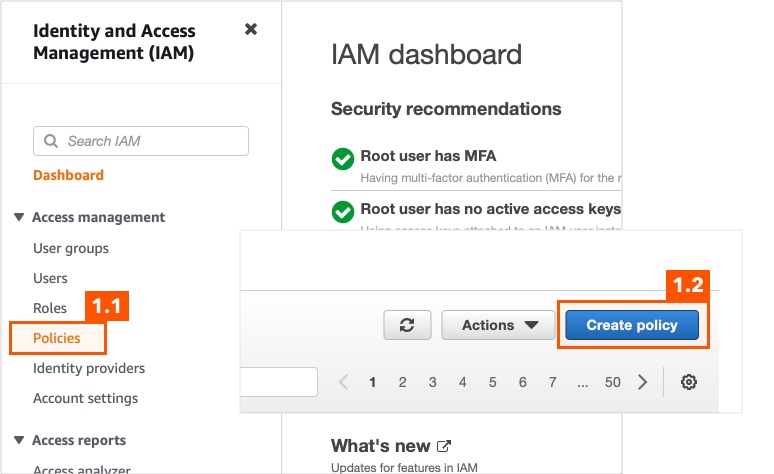
1.1 In your AWS dashboard go to the IAM console, select “Policies” in the left navigation panel
1.2 Then click “Create Policy”
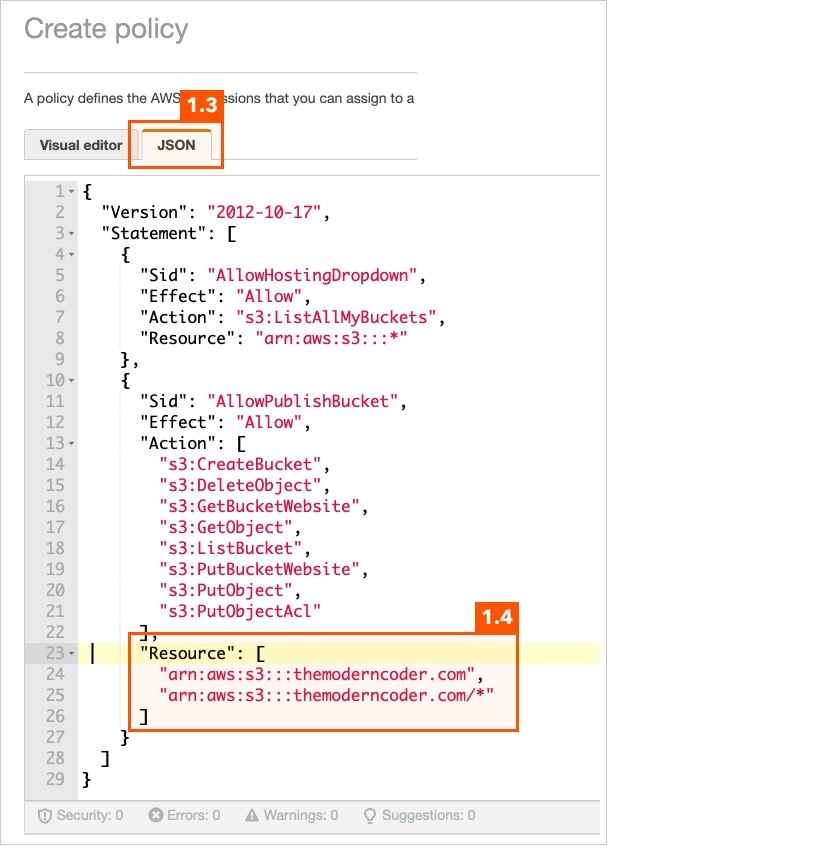
1.3 On the “Create policy” page, select the “JSON” tab.
1.4 Copy the bucket access policy from SiteLeaf’s documentation into the JSON editor, and replace YOURBUCKETNAME in the policy with the name of the S3 bucket where your website’s files are stored. In my case, that bucket name is “themoderncoder.com”
1.5 Click “Next: Tags”
1.6 Leave all fields blank, and click “Next: Review”

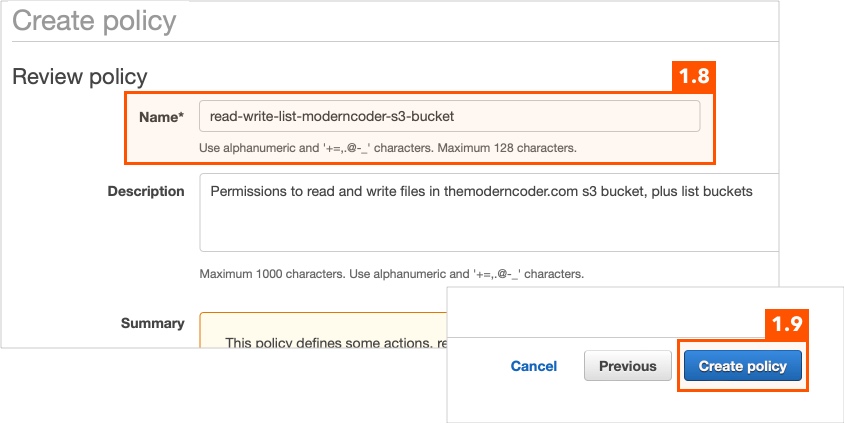
1.8 Give your policy a name & description
1.9 Click “Create Policy”
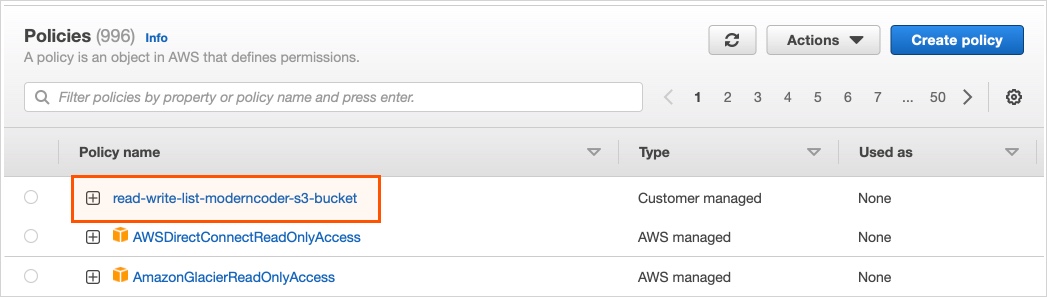
Your policy will now show up in your policies list as a customer managed policy (below). Remember the name of your policy - we’ll be using it later.
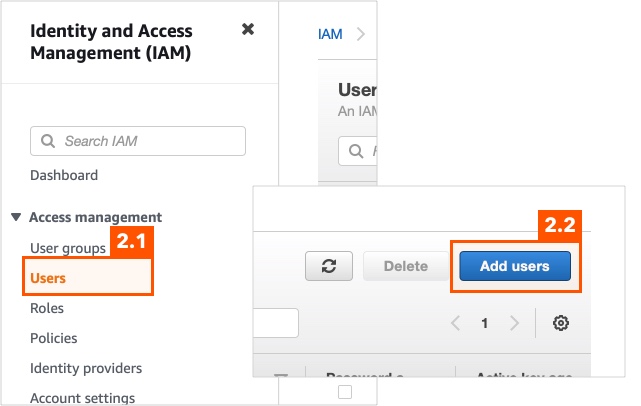
2. Create an IAM user for SiteLeaf
2.1 In your AWS dashboard go to the IAM console, select “Users” in the left navigation panel
2.2 Then click “Add Users”
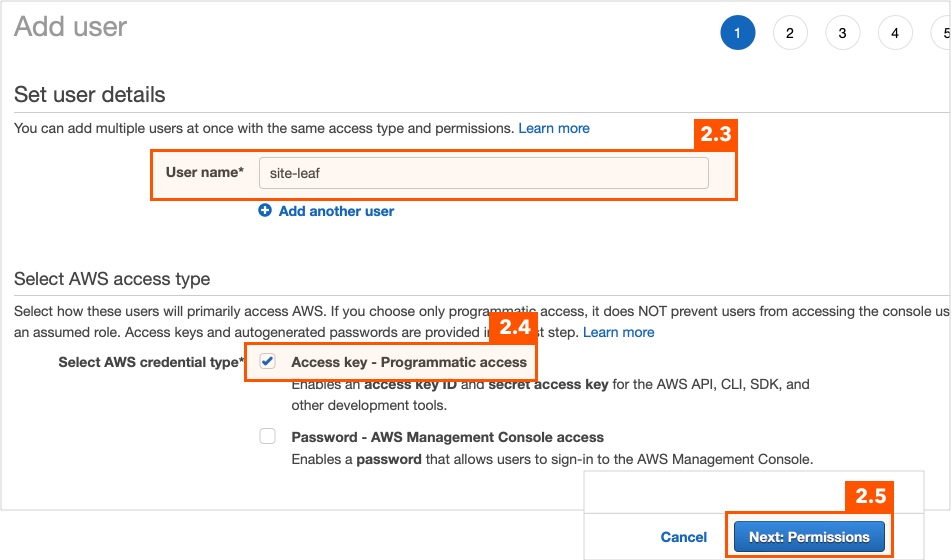
2.3 Give your user a name (I recommend “site-leaf”)
2.4 Select “Access key - Programmatic access”
2.5 Then click “Next: Permissions”
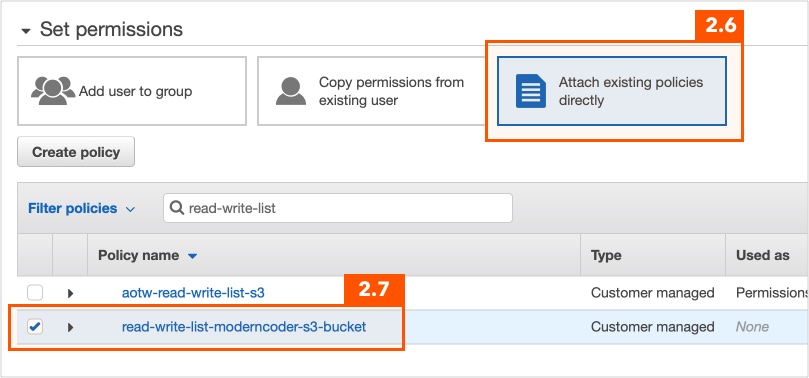
2.6 Under “Set permissions” click “Attach existing policies directly”
2.7 Search for the name of the policy you just created in the search box and click the checkbox next to it in the list. This action will give your user permissions to your site’s S3 bucket as specified by the policy created in step 1.9
2.8 Click “Next: Tags”
2.9 Leave all fields blank, and click “Next: Review”

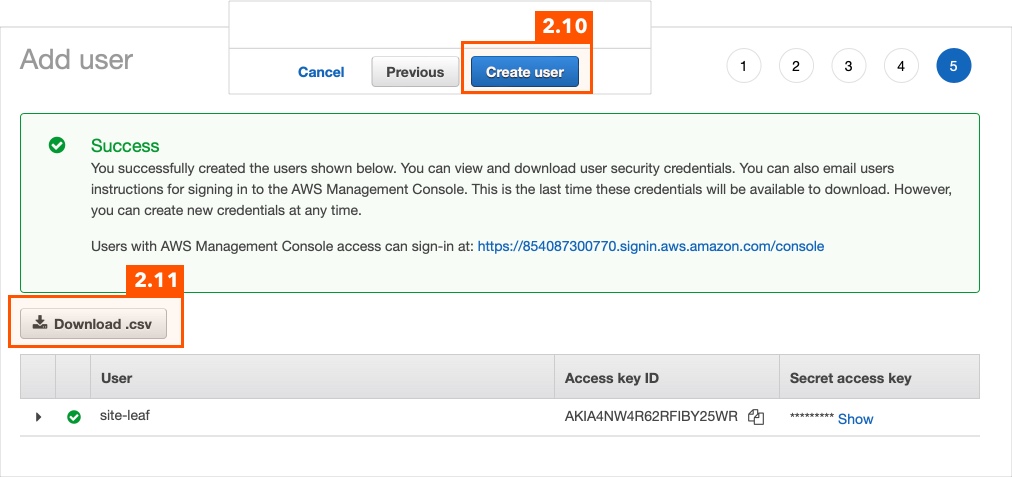
2.10 Click “Create user”. When you get a success message, DO NOT CLOSE the confirmation page
2.11 Download the credentials file
3. Find your S3 bucket’s region
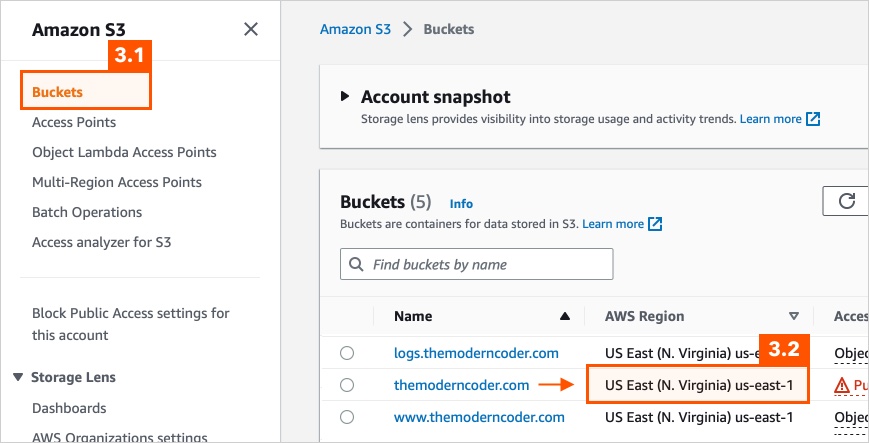
SiteLeaf needs to know which region your S3 bucket resides. To find this, open your AWS console and navigate to S3.
3.1 Select “Buckets” in the left navigation bar
3.2 Find your bucket’s region in the “AWS Region” column of the “Buckets” list
4. Provide the IAM access key and secret key to SiteLeaf
The hard part is over! Now we just need to navigate to SiteLeaf and tell it to use the IAM user credentials we just created in section 2.
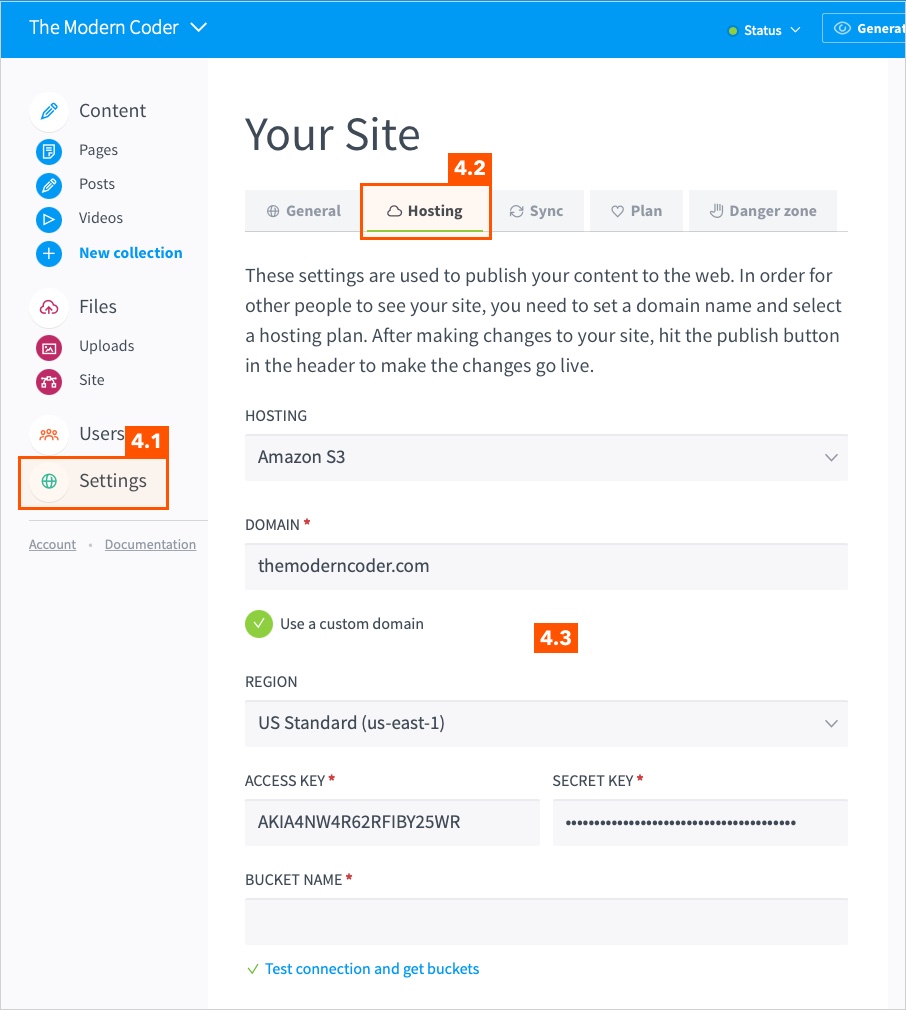
4.1 In SiteLeaf click “Settings” in the left navigation bar
4.2 Click the “Hosting” tab
4.3 Fill in as follows:
-
Hosting: “Amazon S3”
-
Domain: Your website domain name (in my case “themoderncoder.com”)
-
Region: Found in step 3.2
-
Access Key: From the file downloaded in step 2.11
-
Secret Key: From the file downloaded in step 2.11
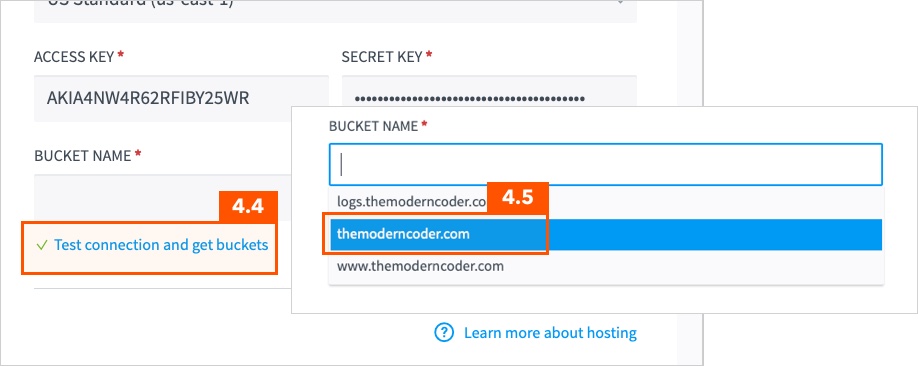
4.4 Click “Test connection and get buckets”
4.5 Select your website’s S3 bucket from the dropdown (in my case “themoderncoder.com”)
4.6 Click “Save” in the top right corner

5. Deploy
5.1 Now that SiteLeaf can reach your bucket, click “Publish changes” in the top right corner to build your site and deploy the new website files to S3.

Warning: Preview your site before deploying by clicking “Generate preview” to make sure everything looks right. Once you click “Publish changes” there are no additional confirmation messages, so make sure you’re ready to go live when you press that button.
It’s also not a bad idea to enable automated S3 backups just in case something goes wrong and you need to restore.
And you’re done!
That’s it. You’ve now successfully configured SiteLeaf to deploy to your S3 bucket. SiteLeaf’s official documentation on this subject can be found here.
Thanks for reading!
A note about CloudFront…
If you’re using CloudFront as a CDN in front of your S3 bucket (and you should because that’s the only way to have an S3-hosted static website use HTTPS), pushing new content to your S3 bucket will not bust your CloudFront cache. This means visitors to your website will see older versions of your content until CloudFront refreshes it’s caches, or you tell CloudFront there are new versions available. To expedite this process, manually tell CloudFront which files were updated - AWS calls this process invalidations.
How to invalidate CloudFront’s caches
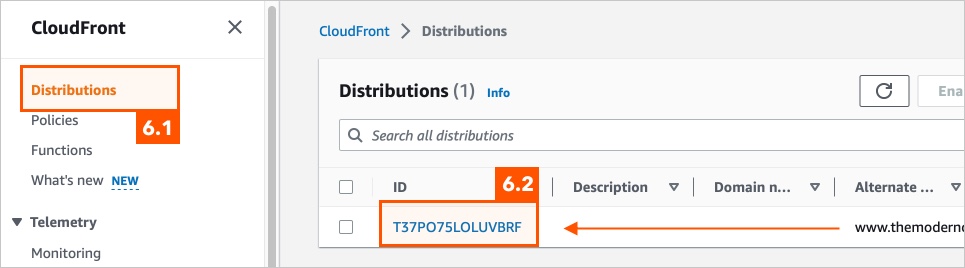
6.1 In your AWS dashboard go to the CloudFront console, and select “Distributions” in the left navigation panel
6.2 Then select the distribution associated with your website in the list
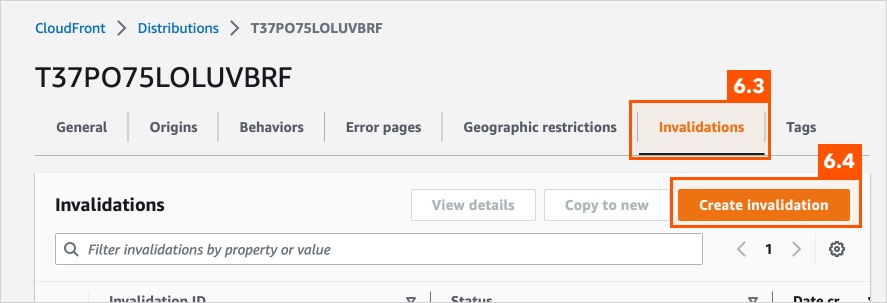
6.3 Navigate to the “Invalidations” tab
6.4 Click “Create invalidation”
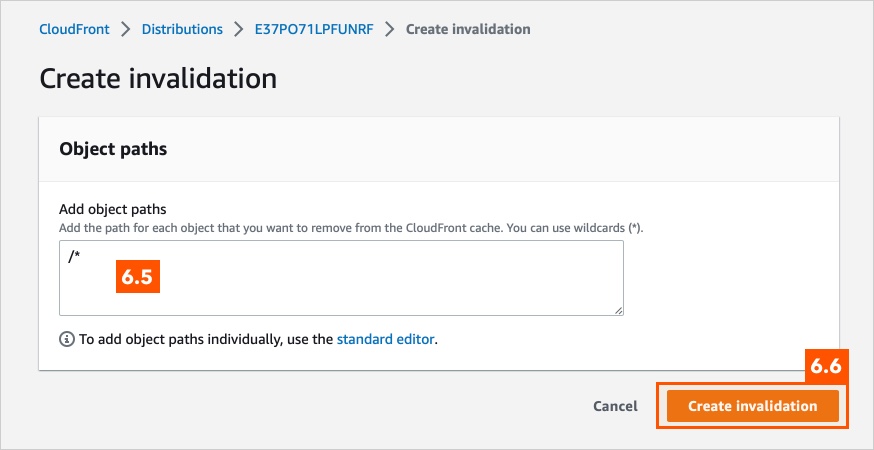
6.5 In the “Add object paths” textarea, list the objects you’d like to invalidate. In this case, /* invalidates all objects in your CloudFront cache. If you’d like to target more specific items you can - more info.
Note: There is a 1000 item limit on the number of free invalidations per month - more info.
6.6 Click “Create invalidation”
Once the invalidation completes, CloudFront will have purged it’s caches of the items you specified. One thing to note, though CloudFront will now serve up the most recent version of the file(s) from S3, a user may still see an old version if they have it client-side cached. The specifics of caching is a complex topic, so that’s all I’ll say for now.